I have really enjoyed learning how to use natural yeast. I love that it is much more self reliant then having to buy commercial yeast. I'm having fun seeing all the cool things I can make with my Natural Yeast Starter!
You will want to be sure to pin this post so you will have it for safe keeping.....Since so many of the sourdough recipes I have made pretty much come from these two recipes I thought I would share them first. Then soon I will share all the fun ways we have used them.
The first recipe is very basic and I think it's cool that it uses so few ingredients but is flexible if you want to add to it. It's like the perfect CHEAP food storage bread recipe. The only thing I found was that you need to have a pretty nice mixer that will mix it well and get the gluten going.
The old mixer I have just doesn't seem to knead it quite good enough so it doesn't work very well for sandwich bread it just becomes too crumbly after the first day. I have seen others make it though with their nice new mixers and it turns out beautifully.
With the second recipe I added a little gluten so it holds together well and makes a great sandwich bread. I also added some other things to make it extra tasty.
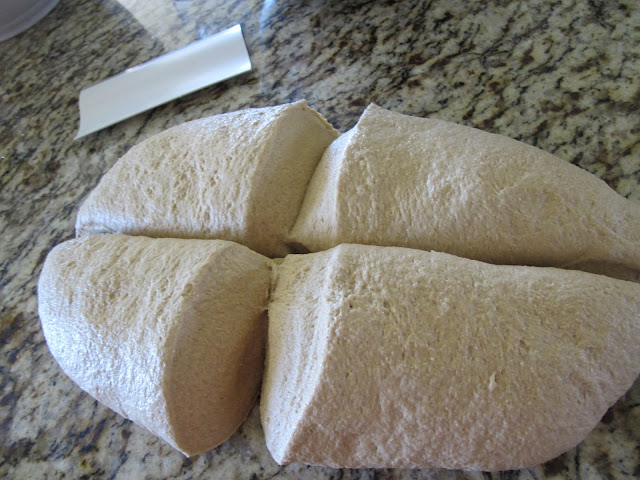
 Feel free to adjust either recipe to suit your tastes. Just know that you are looking for a dough texture that is nice and smooth but on the sticky side. Like in the picture above. Also to divide the bunch of dough into four loaves, I use that cute little pampered chef handy scraper thing
I actually use water now to keep the dough from sticking to my hands or the counter. Just a light mist works really well. Oil would also work but it is more expensive. ;) I found that using flour to keep dough from sticking to the counter gives a more dry texture to the dough. This is with any kind of bread not just sourdough.

3 cups water
2 Tablespoons Real Salt
Fresh Ground Whole Wheat Flour (I use Hard White Wheat) to desired texture, about 10 cups
In mixer add all ingredients and about 5 cups of flour. Mix well, continue to mix while adding flour 1/4 cup at a time until desired texture is achieved. Continue to have mixer knead bread for at LEAST 10 minutes.
Being sure to knead well helps the gluten in the flour to activate, also adding a little lemon juice can help activate the gluten. To be sure there is plenty of gluten you can hold up a piece of dough and if it stretches really thin, to the point of almost being able to see through it, without breaking you will know it is good. If it breaks easily keep mixing.
Divide dough into 4 equal sections and place in greased bread pans. Brush with oil or cover and let rise in a warm place for about 2 hours or until doubled in size. Bake at 350° for 30-40 minutes or until golden brown on top. Brush with coconut oil, let cool for a few minutes then pop out of pans onto cooling rack to finish cooling.
NOTE: You can add oil and/or sweetener of choice (honey, Sucanat, etc.) easily to this bread 1/3 to a 1/2 cup of each works good. But whatever you want just be sure to end up with a good final dough texture by adding more or less flour.
up to 1 cup water depending on how thick start is (optional)
1/3 cup softened coconut oil
1/3-1/2 cup honey
2 Tablespoons Real Salt
2 Tablespoons molasses
1/4 cup Vital Wheat Gluten
Fresh Ground Whole Wheat Flour (I use Hard White Wheat) to desired texture, about 8-10 cups
In bread mixer, mix all ingredients together adding last of flour slowly until desired texture is achieved. (Don't be afraid to use more or less flour to get the right texture) Knead for 10 minutes. Shape into loaves and place in oiled bread pans. Brush with oil or cover and let rise for about two hours in a warm place. Bake at 350° for 30-40 minutes. Remove from oven, brush with oil, let cool for a minute then pop out of pans and let cool on cooling rack.
Final Notes:
A lot of people want to be sure the flour has soaked long enough so they will do a first rising in the mixer and then a second rising in the bread pans. I usually skip the first raising cause I think it makes for a bit more sour bread but it is up to you. For these recipes I have tried to minimize the sourness so it's more like regular bread. A lot of it depends on your start though too.
I have also tried these recipes using part spelt flour part wheat, it was still very good. I bet you could use all spelt if you wanted but would have to play a bit with it to get the right texture. I also want to try it using some Rye flour. I think trying other grains and making a multigrain bread would also be good.
How I build my start to have enough to make four loaves of bread:
The day before I make bread I make sure that I have a quart of start. If not I put it out on the counter and feed it at least once or twice that day.
Then before I go to bed, in a large bowl I take 4 cups of start, 4 cups of water and about 5-6 cups flour. I stir it well then cover it with a large plate. In the morning I have plenty of start to use in my bread with some leftover to keep and continue feeding.
Learn more at my post: Natural Yeast Starter aka {Sourdough Start}
Another Favorite Recipe using a start: Simple Sourdough Waffles
More fun sourdough recipe ideas coming soon!
DO YOU HAVE A START YET?


1 comment:
Tammie- I was wondering if you would email me. I have a question for you…My email is shalycewilson@yahoo.com Thanks:) ~Shalyce
Post a Comment